
-
The LabRat Micro Induction Sterilizer
Regular price $149.99 USDRegular price$224.99 USDSale price $149.99 USDThe LabRat Micro Induction Sterilizer
Regular price $149.99 USDRegular price$224.99 USDSale price $149.99 USDThe LabRat Micro Induction Sterilizer
Regular price $149.99 USDRegular price$224.99 USDSale price $149.99 USDSale -
The FlatTop Micro Induction Sterilizer
Regular price $124.99 USDRegular price$174.99 USDSale price $124.99 USDThe FlatTop Micro Induction Sterilizer
Regular price $124.99 USDRegular price$174.99 USDSale price $124.99 USDThe FlatTop Micro Induction Sterilizer
Regular price $124.99 USDRegular price$174.99 USDSale price $124.99 USDSale


-

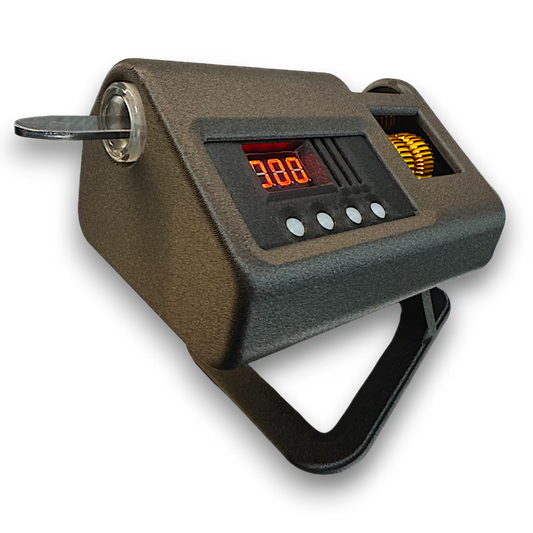
The LabRat. Enclosed and ergonomic
Shop LabRatThe LabRat and FlatTop share the same core components and function the same. LabRat adds an enclosed housing and an ergonomic face and tool insert set to a 22.5 degree angle, which many users find more comfortable during long sterile sessions. The enclosure also reduces exposure to airborne particles while your tool rests between uses. LabRat guide
The LabRat is ideal for scalpels and narrow instruments that need repetitive sterilization during long workflows. If the tool fits and it is ferrous metal, it works. The insert and housing can be a constraint for some larger tools.
The LabRat is enclosed and optimized for tool parking and ergonomic insertion.
-

The FlatTop. Open and easy to wipe down
Shop FlatTopFlatTop delivers the same hands free automation as LabRat, using the same core components. It is open, which makes it simpler to wipe down and some labs prefer that. FlatTop is also a great value option at a lower price point.
The FlatTop has an open design so it accepts a wider variety of tools. It can also handle syringes with ferrous metal needles because there is no insert housing constraint.
The FlatTop is open for the fastest wipe down and simplest access.


Technical details
Default timing and adjustability
Ships pre programmed to run a 7.5 second cycle. Users can reprogram the time delay relay using the built in buttons to match tool mass and personal preference. The relay supports multiple behaviors. For this application only program 1.1, 1.2, and 1.3 apply. Units ship set to program 1.2.
Trigger and metal compatibility
The trigger uses an inductive proximity sensor that detects ferrous metals within about 5 mm. This is intentional. It ensures the unit only triggers on instruments the induction coil can actually heat.
No pedal and no button workflow
Insert or place the tool and the cycle runs automatically for the programmed duration. This eliminates the common workflow where users must hold a button or foot pedal during the cycle.
Compared to Common Alternatives
If you have ever searched for autoclave vs flame vs alcohol vs induction sterilizer for mycology, this is the practical difference. These sterilizers optimize the between plates workflow.
Push Button & Foot Pedal Induction Sterilizer
Often requires you to hold the instrument and actively trigger the cycle each time. You still need to set the tool down to free your hands.
Torch & Flame
Works, but you still need a place to set a hot tool down between uses. It also adds extra motion and can leave residue on tools.
Glass Bead Sterilizers
They can store tools, but require warm up and more routine cleaning. That adds maintenance and workflow friction.
Infrared Sterilizers
Effective, but typically require preheat and often do not store your tool between uses. Many run hot continuously, which can reduce lifespan over time. Infrared and bead options can also work on non ferrous materials like glass. Most mycology tools used for agar work are ferrous metal instruments.
Autoclave & UV
Both are effective sterilization methods. They are not practical for continuous, repeat use of the same instrument during a working session. Autoclaves run in batches and take time. UV works best for surface exposure and requires dwell time and line of sight. Neither solves the core workflow problem of frequent re sterilization and safe tool parking between plates.
Isopropyl Alcohol
Alcohol helps with general sanitation but it is not a fast repeat cycle sterilization method for frequent tool reuse. It needs adequate contact time to be effective and the tool must fully dry before use. Wet alcohol on a tool can also disrupt sterile technique and introduces extra handling steps between every plate.

